|
|
|
 |
|

(click to enlarge) |
|
|
|
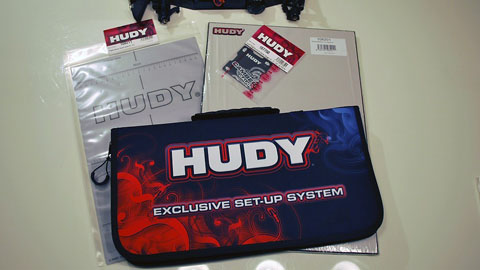
Hello again one and all, I’ve got a nice treat for you today, a sample of the finest RC gear on the planet, pull up a chair and let me show you the bling. :)
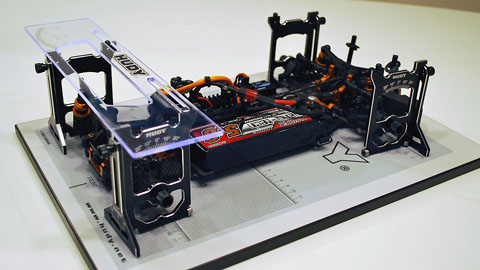
From the top, we have; (Hudy part numbers) 108256 – Hudy Exclusive Setup System for 1/10th with carry case. In order to get the best out of any setup tools, you need a flat surface, so we also have 108201 – Flat setup board for 1/10th cars. A flat surface is only half the job, we also need measurements on the board, so we have a 108211 – Plastic setup board decal for 1/10th, which we will stick to our flat setup board. Lastly, a handy pit tool, part 107750 – a carbon fiber (or graphite) Quick Camber Gauge (included in the setup tools bag, as well as available separately).
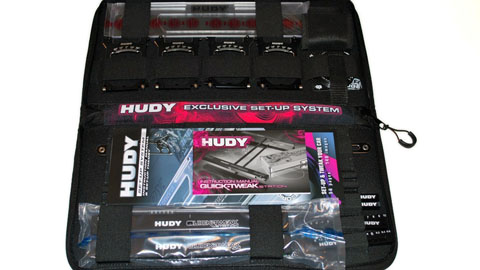
The Hudy Exclusive Setup System (108256) is comprised of the following items…
107702 Chassis Droop Gauge Support Blocks for 1/10 (2)
107712 Chassis Droop Gauge -3 to 10 mm for 1/10 (10 mm)
107714 Ultra-Fine Chassis Droop Gauge 4.0-6.6mm
107716 Ultra-Fine Chassis Ride Height Gauge 3.8-8.0mm
107750 HUDY Quick Camber Gauge for 1/10 Touring 1.5°, 2°, 2.5°
107880 Chassis Balancing Tool (2)
108060 Alu Nut for Set-up Triangle (4)
109305 Universal Exclusive Set-up System for 1/10 Touring Cars
109340 Upside Measure Plate for 1/10 Touring Cars
109360 Alu Nut for 1/10 Touring Set-up System (4)
109370 Alu Set-up Wheel for 1/10 Touring Cars (4)
199220 HUDY 1/10 & 1/12 Set-up System Bag
I’ll be the first to admit that this is not a ‘new’ product, variations of it have been around for a long time, and in fact, most of the people who are likely to get the best out of this will already be aware of its existence, however, the ‘Exclusive Setup System’ Tools are arguably the most evolved set to date offering the best value, and there are very few actual reviews of the features of the kit and even fewer articles advocating why it’s such a very special piece of hardware, so we’ll spend some time going over what it is and what it does right here. Let’s take a closer look… |
|
(click to enlarge) |
|
|
|
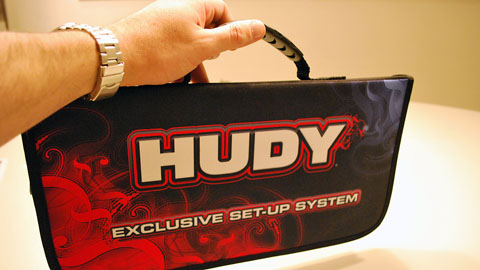
Starting with the main setup tools, they are presented in a deluxe carrying case which features the now classic corporate branding of Hudy, sweeping curves in pink, red and blue, along with a bold HUDY logo. When a product demands a premium as this one does, it is expected that no expense has been spared, and this is evident right from the off with the case. It has a clever multi layer protective foam design but isn’t bulky, and the stitching is of great quality. It’s both attractive and sturdy, though I have to say I might have opted for a slightly less flashy design, but then I’m a ‘less is more’ kind of guy anyway, your mileage may vary. Having said that, the pattern and logo on the case lets everyone know that you have Hudy gear out on the bench, if that kind of recognition is something you desire, just keep it safe!
As well as aesthetically pleasing and tough, the case features pockets and elastic separators for every tool provided. Finishing it off is a decent sized, strong zip with a handy pull tab. Since zips are a common point of failure in items like this, it’s nice to see a heavy duty one. |
|
(click to enlarge) |
|
|
|
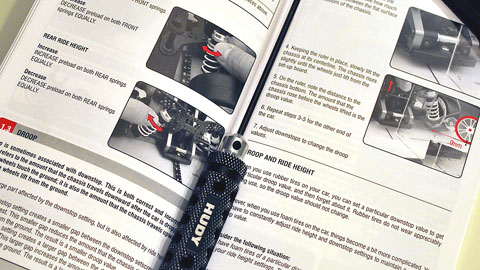
Also included besides the tools, are a manual and theory guide to setting up 1/10th sedans, including where relevant, how to use the Hudy tools. I say where relevant, because this theory guide doesn’t only cover adjustments accomplished using the tools, it covers the whole range of 1/10th sedan setup, a very nice resource. There is also a separate manual for the Quick Tweak Station. Worth noting that Xray model kits usually include a setup guide that is specific to that car or class of cars, referring to correct use of the Hudy Tools as well. With this combination of literary guidance, as well as almost every Xray driver’s setup sheets online, you will not be short of resources for learning about how to make the best use of these tools as well as setting up your car to be the best it can be, regardless what brand you drive..
Moving on to the tools themselves, as soon as you see them you get an instant reminder of Hudy’s unique selling point for everything they make; fit and finish. There are many companies that count themselves among the top manufacturers in this great hobby, and while nobody would deny their claims, as all are great (Mugen, Losi, Tamiya, Kyosho, Serpent, Durango to name a few), I can say from personal experience with models of all these brands and more, that very few produce more ‘beautiful’ parts and accessories than Hudy. Everything is machined perfectly (and I mean perfectly, absolutely flawless), all the printing of the numbers and scales on the parts is also flawless, no paint runs, no missing figures. Everything that moves has a bearing, no bushings or shortcuts here; just an overriding feeling of quality. Everything slides and slots together with the kind of precision you expect from NASA grade parts, there is not a single point for negative discussion, unless you’re melanophobic (scared of black objects)? |
|

(click to enlarge) |
|
|
|
All the machining is CNC from high grade billet aluminum, anodized black, with ultra-precision engraved measurements. Even the thumb screws for mounting the toe/camber/caster gauges are nicely machined, highlighting the exceptional attention to detail.
So, how does it all work!? If you’ve not used setup tools before, it can be a bit daunting, but it’s really very simple when you understand each setting. |
|
(click to enlarge) |
|
|
|
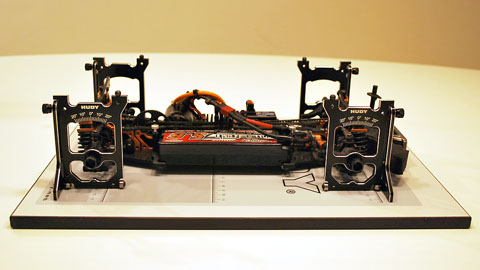
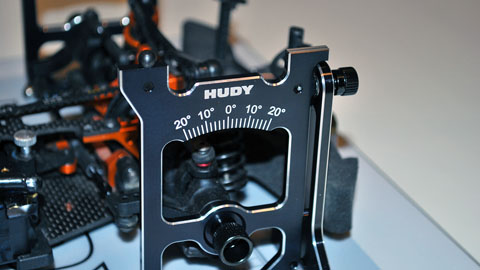
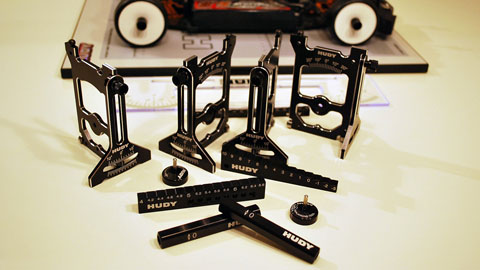
| The main parts of the kit are the camber/caster/toe gauge plates, which give us access to what are arguably the most important settings. With the wheels off, we first assemble the two pieces of the plates and attach them with the supplied screws to the axle stubs of the car, allowing the car to settle on its suspension and the setup stands. We can then simply read off on the gauges what the settings are. |
|
(click to enlarge) |
|
|
|
| To measure toe in/out, place the supplied acrylic toe plate on top of the setup plate guides (short pegs that stick up specifically for the toe plate) and slide it all the way to one side. Reading off the setting on the side that is butted up against the stop gives you your toe setting for that wheel. Simply slide it to the other end to read off the other side. Checking rear settings is performed the exact same way. The usual state for most touring cars is a little toe out on the front wheels and a moderate amount of toe in on the rear wheels. Toe out in front helps initial turn-in, and toe in at the rear aids greatly in straight line stability and accelerating out of corners. |
|
(click to enlarge) |
|
|
|
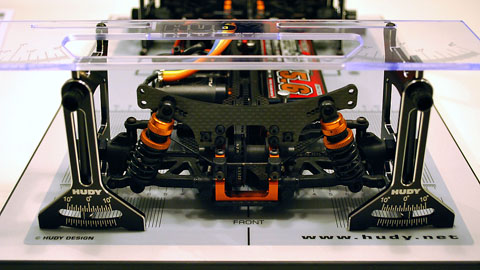
Camber and caster are read from the front and sides respectively of the plates when mounted. You can see this in the photos. Camber (the measurement seen on the front of the tools) manages the tire contact patch during cornering, and caster affects the angle of attack of the front axles, providing bump steer resistance and affecting turning characteristics
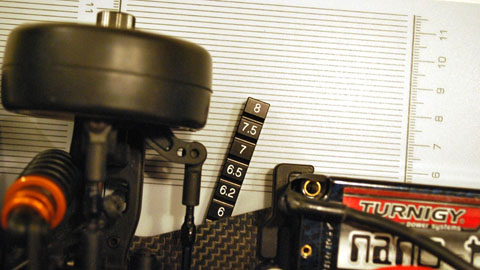
Once you’ve finished playing with the main setup plates, there are plenty of other items we can make use of. Starting with a ride height gauge. This is very simple to use: with the running wheels and tires mounted, you slide the gauge under the car to get your result. Adjust shock preload collars equally on each side to adjust. Do this before measuring tweak and again after correcting any tweak. |
|
(click to enlarge) |
|
|
|
| Then there’re the droop gauges…Droop is an oft ignored yet highly important setting and again, there is a technique to using the tool correctly. You must ‘standardize’ the ride height to get an effective reading from the droop gauges, so there are two (even these are beautiful and feel nice in the hand) aluminum blocks, specifically made for use with the droop gauges, you place them under the chassis to ensure a specific height before using the droop gauge. Before we move on, in case some of you are wondering ‘what the heck is droop??’ |
|

(click to enlarge) |
|
|
|
Droop, to put it in simple terms, is the amount that you can lift the front or rear of the car before the wheels leave the surface. For example, if you pick up the rear of the chassis with a finger, and as soon as you start lifting, the wheels come off the deck (the suspension does not extend at all), that is zero droop. If you are able to lift the chassis 5mm before the wheels leave the deck (the suspension extends a little), that is 5mm droop.
The droop gauge isn’t really a droop gauge, there’s a paragraph dedicated to this in the manual, but essentially the included tool which we call a droop gauge actually measures the downstop setting. They are closely related, but not actually the same thing. This happened because the most common way of adjusting droop is using the downstop setting, however, it’s an important differentiation because ride height also plays a role in droop.
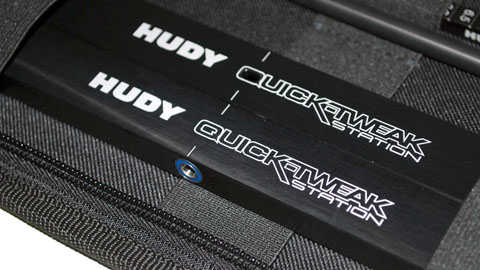
Next up is one of the more interesting parts of the kit to me, as despite being aware of their existence for some time, I had never used a Tweak Station before. As the name implies, it measures ‘tweak’. Yeh, yeh, I hear ya, what the hell is tweak…? |
|
(click to enlarge) |
|
|
|
Tweak is the propensity of an assembled chassis to twist and can be caused by a wide variety of things, ranging from careless building to battery position. To visualise tweak, imagine holding a car in midair, when you look down the chassis from front to back it may be visible that the front and rear axles are not exactly on the same plane. The front left tire maybe a touch lower than the rear left and the front right a touch higher, implying that the chassis is somehow twisted, even if only a little – this is a very undesirable characteristic but once it is identified it can usually be corrected.
So, how does the Hudy Quick Tweak Station (not to be confused with the Hudy Professional Tweak Station, which is not supplied in this kit as some of the press photos appear to show) work? Basically you assemble an H type structure where one side of the H is solid and the other floats like a see-saw on a bearing. Placing one end of the car on the non-see-saw end (solid end), allows the see-saw end to rotate as much as needed with no interference from the surface you are using. An embedded spirit level helps you see the effect of adjustment, which typically involves adjusting the preload on the shocks. Cleverly, the spirit level is also employed during the construction of the station, to ensure the straightness of the whole H assembly as you build it. Using a perfectly flat surface is critical, otherwise you may introduce tweak rather than correct it. The setup board when placed on a similarly level surface makes an ideal base for this. |
|
(click to enlarge) |
|
|
|
| There’s little more to say about the setup board. As a very rigid, flat piece of wood, it is excellent, which is pleasing though not entirely unexpected. It is covered in a layer of white plastic which is finely textured. The setup decal that provides additional measurements when stuck to the setup board is of typical Hudy precision, printed clearly and so far is stuck well to the Hudy board. Good adhesion is not my usual experience with sticking stickers to textured surfaces, they tend to lift after temperature changes, but we shall see. So far I’m impressed with it’s level of stickiness. |
|
(click to enlarge) |
|
|
|
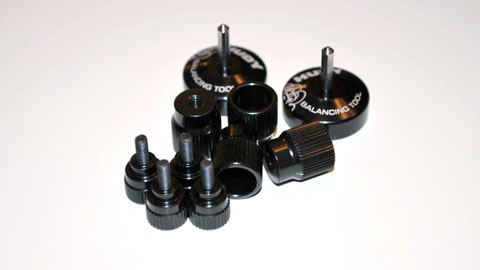
| As I checked the remainder of the carry bag to be sure I had removed everything, I came across a pleasant balancingsurprise; in the little pocket were the chassis balancing tools. I had forgotten that these were included. They are like big thumb tacks that you place point up and balance the chassis on. The pins locate in holes in the underside of the car’s main chassis front and back and allow you to check lateral balance. Combining these with the tweak station gives you almost the equivalent of a corner balanced setup. |
|
(click to enlarge) |
|
|
|
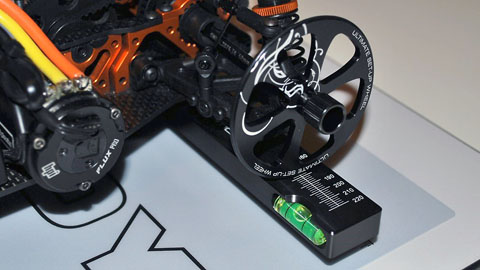
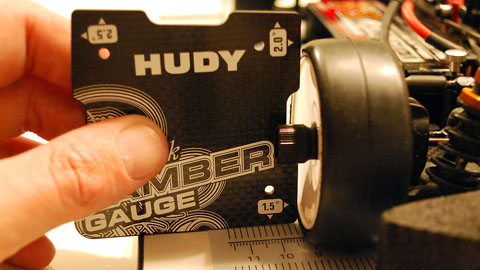
| A nod before closing, to the quick camber gauge. Despite being just a piece of 2 dimensional carbon fiber, this little beauty still manages to be impressive looking. The carbon fiber shimmers with that holographic effect you sometimes see in the weave and the white design and details really set it off. Naturally, these give us the ability to quickly check camber rather than set up the whole station. They are pre-cut to measure the most commonly used camber figures (1.5, 2.0 and 2.5 degrees, depending on which side of the square you use), you just butt this up against either the wheels and tires, or against the setup wheels supplied (which also happen to look completely awesome, see large pic above) to instantly see how good the alignment is. Simple and effective, the best kind of tool. |
|
(click to enlarge) |
|
|
|
So let’s wrap this up then and address that elephant in the room. The price. Yes, this is a seriously expensive piece of kit, but there is more than that to consider. Quality equals durability in most cases, and these tools will almost literally last forever. My first setup station served me fine, but over the years, it eventually got sloppy until one day it was useless. I guess I got my money’s worth out of it, but the ball raced nature of the Hudy station ensures that if the bearings are maintained, it can’t wear out. Ever. This toolset could last an entire career of RC racing and even be passed on to the next generation. There aren’t many tool making companies that can make that claim these days.
Always a bonus of combo deals like this where a number of different tools are included in a set, is the fact that it’s all designed to work together, and does, perfectly. It doesn’t hurt either, that every single piece is really nicely made, even the most humble pair of aluminum chassis stands (hollow by the way) or thumb screws for the setup wheels (also hollow), are machined to perfection and ooze quality. This is a true ‘buy-once’ item; an investment as well as a statement that you are a racer who appreciates the best. Even if you know that you don’t really ‘need’ something this good, don’t worry, very few of us do. It’s OK to treat yourself now and again…it’s a really nice thing to have and makes you feel like a pro racer whenever you use it. |
|

(click to enlarge) |
|
|
|
A word to the wise; it can be very tempting to tinker with your car when it’s so easy and fun to do so, but be careful not to just make yourself inconsistent. Don’t make more than one or two changes at the same time, before testing the effect of those changes. To be able to perform meaningful tests, you need to be consistent enough to count the difference in lap times, that’s why we’re here after all. Until you can do 12 or so laps within a second of each other at the most on a base setup, it’s not worth making any changes at all. First be consistent.
So there you have it. If you are in the market for setup tools to enhance your sedan (or 1/8th buggy or truggy, Hudy also makes a 1/8th off road set) racing career, you can do no better than these tools, but then again you probably already knew that, so let me just hope that I’ve inspired you to check the savings and put it on the wishlist for Christmas, you’ll be glad you did the moment you open it. ;) Aside from the tools; the setup board, board decal and quick camber gauge, while they may only be simple items, are also extremely well implemented. The attention to detail shown throughout all the items in this article is on another level, a lesson in refinement. These tools receive my highest possible recommendation.
Enjoy a few extra pics below. Foxy out… |
|
(click to enlarge) |
|
|
(click to enlarge) |
|
|
(click to enlarge) |
|
|
(click to enlarge) |
|
|
|
|
|